System Configuration
The arch 1 runs a customized version of the PYNQ operating system image installed on its NVMe SSD.
Troubleshooting IP Adresss Assignment
To troubleshoot the IP address assignment, connect to the serial port, run the ip addr command and look for addresses under eth0
ip addr
$ ip addr
1: lo: <LOOPBACK,UP,LOWER_UP> mtu 65536 qdisc noqueue state UNKNOWN group default qlen 1000
    link/loopback 00:00:00:00:00:00 brd 00:00:00:00:00:00
    inet 127.0.0.1/8 scope host lo
    valid_lft forever preferred_lft forever
    inet6 ::1/128 scope host
    valid_lft forever preferred_lft forever
2: dummy0: <BROADCAST,NOARP> mtu 1500 qdisc noop state DOWN group default qlen 1000
    link/ether 1a:e6:83:d3:68:ff brd ff:ff:ff:ff:ff:ff
3: sit0@NONE: <NOARP> mtu 1480 qdisc noop state DOWN group default qlen 1000
    link/sit 0.0.0.0 brd 0.0.0.0
4: eth0: <BROADCAST,MULTICAST,UP,LOWER_UP> mtu 1500 qdisc mq state UP group default qlen 1000
    link/ether 16:3f:1a:b4:67:8a brd ff:ff:ff:ff:ff:ff
    inet 192.168.1.3/24 brd 192.168.1.255 scope global dynamic eth0
    valid_lft 86398sec preferred_lft 86398sec
    inet6 fe80::143f:1aff:feb4:678a/64 scope link
    valid_lft forever preferred_lft forever
Opening a shell
There are three ways to open a shell on an arch 1 target. The serial port is the only one that exposes boot messages.
The USB controller exposes four virtual ports, the second of which is connected to the PS serial console. On Linux, the block device will typically be attached to /dev/ttyUSB1. This can be verified using dmesg:
Finding the block device
$ sudo dmesg
(...)
[2278.099034] usb 1-1.4: new high-speed USB device number 9 using xhci_hcd
[ 2278.236318] usb 1-1.4: New USB device found, idVendor=0403, idProduct=6011, bcdDevice= 8.00
[ 2278.236327] usb 1-1.4: New USB device strings: Mfr=1, Product=2, SerialNumber=3
[ 2278.236331] usb 1-1.4: Product: NOA arch1
[ 2278.236334] usb 1-1.4: Manufacturer: Xilinx
[ 2278.236337] usb 1-1.4: SerialNumber: A100001
[ 2278.330298] usbcore: registered new interface driver usbserial_generic
[ 2278.330309] usbserial: USB Serial support registered for generic
[ 2278.331928] usbcore: registered new interface driver ftdi_sio
[ 2278.331941] usbserial: USB Serial support registered for FTDI USB Serial Device
[ 2278.332091] ftdi_sio 1-1.4:1.0: FTDI USB Serial Device converter detected
[ 2278.332121] usb 1-1.4: Detected FT4232H
[ 2278.336350] usb 1-1.4: FTDI USB Serial Device converter now attached to ttyUSB0
[ 2278.336386] ftdi_sio 1-1.4:1.1: FTDI USB Serial Device converter detected
[ 2278.336413] usb 1-1.4: Detected FT4232H
[ 2278.341332] usb 1-1.4: FTDI USB Serial Device converter now attached to ttyUSB1
[ 2278.341359] ftdi_sio 1-1.4:1.2: FTDI USB Serial Device converter detected
[ 2278.341381] usb 1-1.4: Detected FT4232H
[ 2278.346335] usb 1-1.4: FTDI USB Serial Device converter now attached to ttyUSB2
[ 2278.346381] ftdi_sio 1-1.4:1.3: FTDI USB Serial Device converter detected
[ 2278.346412] usb 1-1.4: Detected FT4232H
[ 2278.351325] usb 1-1.4: FTDI USB Serial Device converter now attached to ttyUSB3
You can then use a terminal emulator like screen or tio to open a shell:
Opening a session
# likely pre-installed
screen /dev/ttyUSB1 115200 # ctrl+a, ctrl+d to exit

# simpler to use
tio /dev/ttyUSB1 # ctrl+t, q to exit
The USB controller exposes four virtual ports, the second of which is connected to the PS serial console. On Mac, the block device associated to it is typically /dev/tty.usbserial-A1XXXXX1 where XXXXX are the last 5 digits of the device serial number.
You can then use a terminal emulator like screen or tio to open a shell:
Opening a session
# likely pre-installed
screen /dev/tty.usbserial-A1XXXXX1 115200 # ctrl+a, ctrl+d to exit

# simpler to use
tio /dev/tty.usbserial-A1XXXXX1 # ctrl+t, q to exit
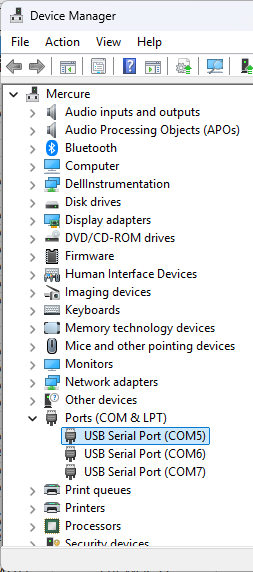
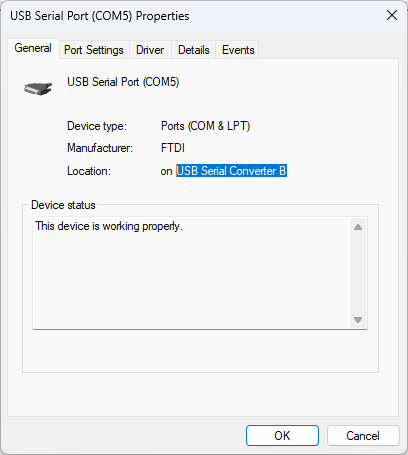
The USB controller exposes four virtual ports, the second of which is connected to the PS serial console. On Windows, the Device Manager can be used to determine which COM port it is associated to.
Device Manager
Note down which COM port appears when plugging in the USB cable and is located on USB Serial Converter B.
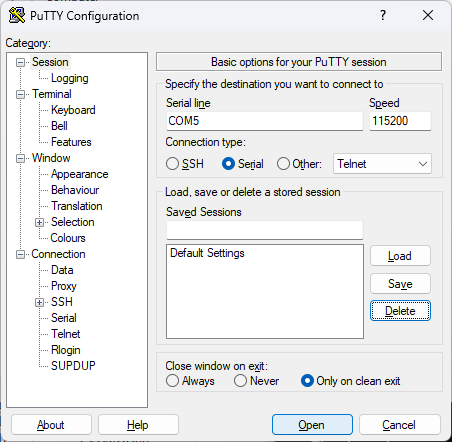
Serial consoles like PuTTY can then be used to open a shell:
When the device is connected to the network or using a link-local address, it can be connected to using its serial number-based hostname.
SSH
ssh xilinx@arch1-XXXXX.local # password: xilinx
When the device is connected to the network or using a link-local address, a shell session can be opened in a web browser using the Jupyter Notebook.
Password: xilinx

System Image Updates
To allow for robust updates, the SSD follows a A/B root partition scheme, with an additional partition for user data. This allows for the automatic rolling back of a system update if it fails its first boot.
Performing an Update
-
Copy the updated image and signature (.iso, .iso.minisig) files to the device's SSD or SD Card
- Open a shell session
-
Run
# If the image is on the SD Card sudo noa-update update --sdcard # If the image is on the SSD sudo noa-update update --img /path/to/file.img -
Reboot the device
Warning
Even though user data is preserved across updates, it is a good idea to keep a backup of important user data at all time, even more so during updates.
Rolling Back an Update
The bootloader automatically rolls back an update if it fails its first boot. To manually roll-back an update, follow these steps:
- Open a shell session
- Run
sudo noa-update rollback