Getting started
The host is your computer. The target is the FPGA platform connected to it. Rexys supplies the PYNQ image for the target, including images for supported commercial boards.
First establish the network connection. You do not need to install NOA Python Client or open Jupyter to perform this check.
Identify your hardware target
| Target | Which instructions apply? |
|---|---|
| NOA arch 1 | Follow steps 1–3 below, then choose your software workflow in step 4. |
| PYNQ-Z2 / Eclypse Z7 | Prepare the board using System images and SD card setup. Download links are not yet published. Use the network settings supplied with the matching image; the arch 1 address conventions below do not apply. |
Scope of this connection guide
Steps 1–3 describe NOA arch 1. Board-specific setup guides for other targets are not yet included here. Once your board is connected, you can check reachability with ping using its actual address and continue to the workflow selection.
1. Prepare and connect NOA arch 1
NOA arch 1 is delivered with its PYNQ image. Connect the device over Ethernet and power it on, allowing it to finish booting. If you need to restore its software, use the Rexys-provided image for this target.
Connect the target and your computer to the same local network, using a router with DHCP enabled.
Connect the target's Ethernet port directly to your computer. The existing NOA arch 1 instructions describe automatic link-local connectivity on some hosts, including Windows. If automatic connectivity does not work, use a router or the manual configuration instructions below.
For NOA arch 1, the existing manual network configuration instructions describe the fallback IP address and the computer's subnet settings. These addresses are specific to arch 1; use the appropriate configuration for other boards.
The local connection does not require Internet access. Software downloads and installation are separate steps.
2. Identify the NOA arch 1 address
For NOA arch 1, find the serial number on the label at the back of the device. The hostname is arch1-0ABCD.local, where ABCD are the last four digits of that serial number.
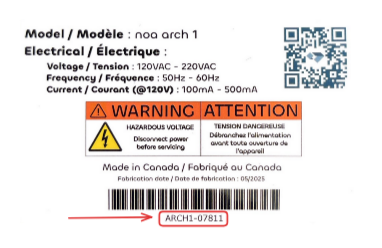
For example, ARCH1-02345 corresponds to arch1-02345.local.
You can also use the target's IP address. For a DHCP connection, find it in your router's connected-device list. For another board, use the hostname or address configured in its Rexys-provided image.
3. Check NOA arch 1 connectivity with ping
Open a terminal on your computer: PowerShell or Command Prompt on Windows, or a terminal on Linux/macOS. Replace the example hostname with your own:
ping arch1-02345.local
Replies from the target confirm that it is reachable over the network. Use Ctrl+C to stop the command if it continues running.
If the hostname cannot be resolved, try ping with the target's IP address instead. If there are no replies, check power, boot completion, the Ethernet cable and your computer's network configuration. A failed ping can also result from filtering of ICMP traffic.
What this check confirms
Ping checks network reachability. It does not verify the Toolbox or noa-client services, or whether an FPGA design is loaded. Your chosen workflow will check those next.
4. Choose your workflow
These are the recommended starting points for new users:
| Workflow | Where you work | Purpose |
|---|---|---|
| NOA Toolbox | MATLAB/Simulink on your computer | Develop models and use the Toolbox workflow |
| NOA Python Client | Python scripts or a terminal on your computer | Load designs, configure I/O, access registers and acquire data over the network |
Choose NOA Python Client to automate experiments or integrate the platform into a Python application. It does not require a browser. It controls a compatible FPGA design; it does not synthesize Python into FPGA logic.
You can combine these workflows: generate a design with Toolbox, then control it from Python on your computer. The continuous ECG example demonstrates this approach. For a first Toolbox project, start with the sine wave walkthrough. Browse all projects in Examples and applications.
Work directly on the target
PYNQ / Jupyter is a separate, target-side workflow. You open Jupyter in a browser on your computer, but the notebook's Python code runs on the target. This remains useful for working directly with PYNQ overlays and drivers.
Both Python libraries use the package name noa, but their APIs are different:
| Host-side client | Target-side PYNQ drivers |
|---|---|
Installed from noa-client on your computer |
Provided in the target environment |
Uses from noa.noa import Noa and asynchronous calls |
Uses the PYNQ NoaOverlay API |
| Client API reference | NOA API for PYNQ |
Continue with Toolbox installation, Python client installation, or PYNQ / Jupyter, depending on your chosen workflow.